Latex 备忘录
一些关于 Latex 的琐碎笔记,提升编辑体验和最终效果。
文本编辑
一些规范和习惯
- 括号前需要有 1 个空格
- 例如:
This is a test (see Section 2.1).
- 例如:
- 公式结尾需要有 1 个句号或逗号
- 例如:
$$y = ax + b.$$
- 例如:
- 文献引用前需要有 1 个空格
- 例如:
This is a cite \cite{ref1}
- 例如:
- 对于经常出现的名称类词组(方法名、模型名),使用宏定义,以保证一致性、修改方便
- 例如::
\newcommand{\greedy}{Greedy Algorithm}
- 例如::
- 使用
\ie和\eg代替i.e.(that is) 和e.g.(for example) - 引用表格时,不用缩写
- 例如:
Table 1而非Tab. 1
- 例如:
- 引用图片时,句首处使用
Figure,其他地方使用Fig.- 例如:
Figure 1 shows …和…, as shown in Fig. 1.
- 例如:
公式编辑
几种公式环境的比较
gather*环境在设置全局左对齐后,适合写公式推导;align环境每行一个编号;gather居中对齐。
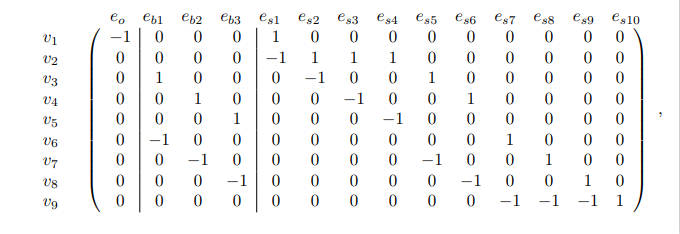
复杂矩阵
对矩阵中的块、行和列进行标记。
方法一
\begin{equation}
\bordermatrix{
    & e_\text{o} & & e_\text{b}  & & & & & &e_\text{s}  & & & & &\cr
v_1    &-1  &0 &0 &0   &1 &0 &0 &0 &0 &0 &0 &0 &0 &0 \cr
v_2    &0   &0 &0 &0   &-1&1 &1 &1 &0 &0 &0 &0 &0 &0 \cr
v_3    &0   &1 &0 &0   &0 &-1&0 &0 &1 &0 &0 &0 &0 &0 \cr
v_4    &0   &0 &1 &0   &0 &0 &-1&0 &0 &1 &0 &0 &0 &0 \cr
v_5    &0   &0 &0 &1   &0 &0 &0 &-1&0 &0 &0 &0 &0 &0 \cr
v_6    &0   &-1&0 &0   &0 &0 &0 &0 &0 &0 &1 &0 &0 &0 \cr
v_7    &0   &0 &-1&0   &0 &0 &0 &0 &-1&0 &0 &1 &0 &0 \cr
v_8    &0   &0 &0 &-1  &0 &0 &0 &0 &0 &-1&0 &0 &1 &0 \cr
v_9    &0   &0 &0 &0   &0 &0 &0 &0 &0 &0 &-1&-1&-1&1 \cr
},
\end{equation}
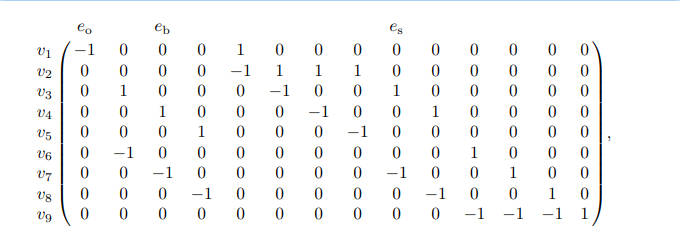
最简单,但暂未找到划分块的方法。
方法二
\begin{equation}
    \begin{array}{cc}
        &  \begin{array}{c ccc ccccccccccc} e_o &\quad  &e_{b} & \quad & \quad & \quad & \quad & \quad & \quad & e_s & \quad & \quad & \quad & \quad & \quad \end{array}\\
    \begin{array}{c} v_1\\v_2\\v_3\\v_4\\v_5\\v_6\\v_7\\v_8\\v_9\end{array}&
    \left(
    \begin{array}{c|ccc|cccccccccc}
        -1  &0 &0 &0   &1 &0 &0 &0 &0 &0 &0 &0 &0 &0\\
        0   &0 &0 &0   &-1&1 &1 &1 &0 &0 &0 &0 &0 &0\\
        0   &1 &0 &0   &0 &-1&0 &0 &1 &0 &0 &0 &0 &0\\
        0   &0 &1 &0   &0 &0 &-1&0 &0 &1 &0 &0 &0 &0\\
        0   &0 &0 &1   &0 &0 &0 &-1&0 &0 &0 &0 &0 &0\\
        0   &-1&0 &0   &0 &0 &0 &0 &0 &0 &1 &0 &0 &0\\
        0   &0 &-1&0   &0 &0 &0 &0 &-1&0 &0 &1 &0 &0\\
        0   &0 &0 &-1  &0 &0 &0 &0 &0 &-1&0 &0 &1 &0\\
        0   &0 &0 &0   &0 &0 &0 &0 &0 &0 &-1&-1&-1&1\\
    \end{array}
    \right)
        \end{array},
\end{equation}
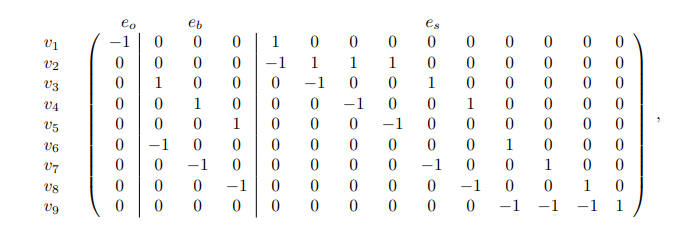
此处手动调整第一行 array 的列间距。
方法三
\begin{equation}
    \begin{array}{cc}
        &  \begin{array}{c c ccc cccccccccc} & e_o &e_{b1}  &e_{b2} & e_{b3} & e_{s1} & e_{s2} & e_{s3} & e_{s4} & e_{s5} & e_{s6} & e_{s7} & e_{s8} & e_{s9} & e_{s10} \end{array}\\
    \begin{array}{c} v_1\\v_2\\v_3\\v_4\\v_5\\v_6\\v_7\\v_8\\v_9\end{array}&
        \left(
    \begin{array}{c|ccc|cccccccccc}
        -1  &0 &0 &0   &1 &0 &0 &0 &0 &0 &0 &0 &0 &0\\
        0   &0 &0 &0   &-1&1 &1 &1 &0 &0 &0 &0 &0 &0\\
        0   &1 &0 &0   &0 &-1&0 &0 &1 &0 &0 &0 &0 &0\\
        0   &0 &1 &0   &0 &0 &-1&0 &0 &1 &0 &0 &0 &0\\
        0   &0 &0 &1   &0 &0 &0 &-1&0 &0 &0 &0 &0 &0\\
        0   &-1&0 &0   &0 &0 &0 &0 &0 &0 &1 &0 &0 &0\\
        0   &0 &-1&0   &0 &0 &0 &0 &-1&0 &0 &1 &0 &0\\
        0   &0 &0 &-1  &0 &0 &0 &0 &0 &-1&0 &0 &1 &0\\
        0   &0 &0 &0   &0 &0 &0 &0 &0 &0 &-1&-1&-1&1\\
    \end{array}
        \right)
        \end{array},
\end{equation}
其他复杂矩阵
可参考:如何用latex编写矩阵(包括各类复杂、大型矩阵)?|知乎
图片绘制
几种 tex-matplotlib 配合使用比较
总体而言,有 tikz、pgf 和 pdf 三种导入方式。考虑到 pdf 更易查阅,个人更倾向 pdf 方式。
- 使用 nschloe/tikzplotlib 中的
tikzplotlib.save("mytikz.tex")命令将 matplotlib 绘图转成 tikz 命令- 写这段文字时,该项目已经一年多没有更新;
- tex 中绘图结果 python 脚本绘图结果有差异;
- 可以完全保证图片字体与正文字体一致。
- 使用 matplotlib 直接导出 pgf
- 生成的 pgf 文件为命令行;
- tex 中绘图结果与 python 脚本绘图结果一致。
- 使用 matplotlib 直接导出 pdf
- 生成的 pdf 文件常见,可用常用浏览器打开;
- tex 中直接导入该文件,不涉及再次渲染。
matplotlib 中使用如下命令控制字体大小和图片尺寸:
matplotlib.rcParams.update({'font.size': 8})
matplotlib.rcParams.update({'figure.figsize': [4., 2.5]})
tex-visio 配合使用
- visio 绘图时,注意统一大小
- 页面大小:A4 paper
- 缩放比例:100% 实际尺寸
- 字体大小:小四号 12pt
- visio 导出时,生成 pdf 矢量图
设计->大小->适应绘图:用于去掉白边- 导出 pdf:在
选项栏,勾选当前页,取消辅助功能文档结构标记:用于去掉外边框
- latex 导入时
- 使用默认大小导入图片
图表占一页且空白较多
\renewcommand{\floatpagefraction}{.9}
允许页面 90%为图片,10%为文字。
默认是 50%是图片,50%是文字,因此占比超过 50%的图片会单独一页。
表格排版
- 如果表格中某项内容较长,可以使用表格内换行,优化表格的显示效果。
- 适当的进行加粗或加阴影,突出表格的重点内容。
- 表格内可以放示意图,以更直观。
表格组织示例
参考:https://www.overleaf.com/read/hypvpvnzjjwx
表格固定宽度并自动换行
方法一:指定列宽
将 \begin{tabular}{llll} 改为 \begin{tabular}{p{10em}p{4em}p{4em}p{16em}}
- m 垂直居中
- p 垂直靠上
- b 垂直靠下
方法二:使用 tabularx 宏包
\usepackage{tabularx}
\begin{tabularx}{\textwidth}{XXXX}
    \hline
    \textbf{Column 1} & \textbf{Column 2} & \textbf{Column 3} & \textbf{Column 4} \\
    \hline
    Item 1 & Item 2 & Item 3 & Item 4 \\
    Item 1 & Item 2 & Item 3 & Item 4 \\
    \hline
\end{tabularx}
表格跨页
跨页长表 · mohuangrui/ucasthesis Wiki
表格横排
横排图表 · mohuangrui/ucasthesis Wiki
罗列
\begin{enumerate}[label=Step\arabic*, leftmargin=6em]
    \item 静置 \SI{10}{\second};
    \item 以\SI{2}{C}的倍率放电 \SI{10}{\second};
    \item 静置 \SI{60}{\second};
    \item 以\SI{2}{C}的倍率充电 \SI{10}{\second};
    \item 静置 \SI{60}{\second};
    \item 重复上述脉冲序列一次。
\end{enumerate}
交叉引用
跨文件交叉引用
- 使用
xr宏包:\usepackage{xr}; - 导入待引用标签的文件:
\externaldocument{texfile}。
公式引用
使用 \eqref 自带括号。
使用 cleveref 宏包自动确定交叉引用格式
官方文档:cleveref.pdf。
加载宏包
\usepackage{cleveref}
基本用法
1. \label{eq:1}, ..., \cref{eq:1} % 自动添加前缀 eq.
2. \Cref{fig1} % 自动添加大写的前缀 Fig. , 适用于句首
3. \cref{eq1,eq2,eq3,,eq4} % 多重引用, eqs. (1) to (3) and (4)
4. \crefrange{eq1}{eq3} % 范围引用, eqs. (1) to (3)
5. \cpageref{sec2} % 页码引用, page 2
自定义格式
\crefformat{equation}{Eq.~(#2#1#3)} % 自定义公式引用格式
文献引用
biber 和 bibtex
biber 更为强大,使用 biber 命令进行编译。
\documentclass{article}
% \usepackage[backend=biber]{biblatex}  % 使用biber作为后端处理引用,可进行更精细的参考文献设置
\usepackage[backend=biber,style=mystyle]{biblatex}  % 使用biber作为后端处理引用,并使用mystyle.sty作为样式文件
\addbibresource{sample.bib}  % 引用的数据库

\begin{document}
Hello world \cite{ref1}.

\printbibliography  % 打印参考文献列表
\end{document}
bibtex 适配更好,使用 bibtex 命令进行编译。
\documentclass{article}

\begin{document}
Hello world \cite{ref1}.

\bibliography{sample}  % 引用的BibTeX数据库文件名
\bibliographystyle{mystyle}  % mystyle是你的.sty文件名
\end{document}
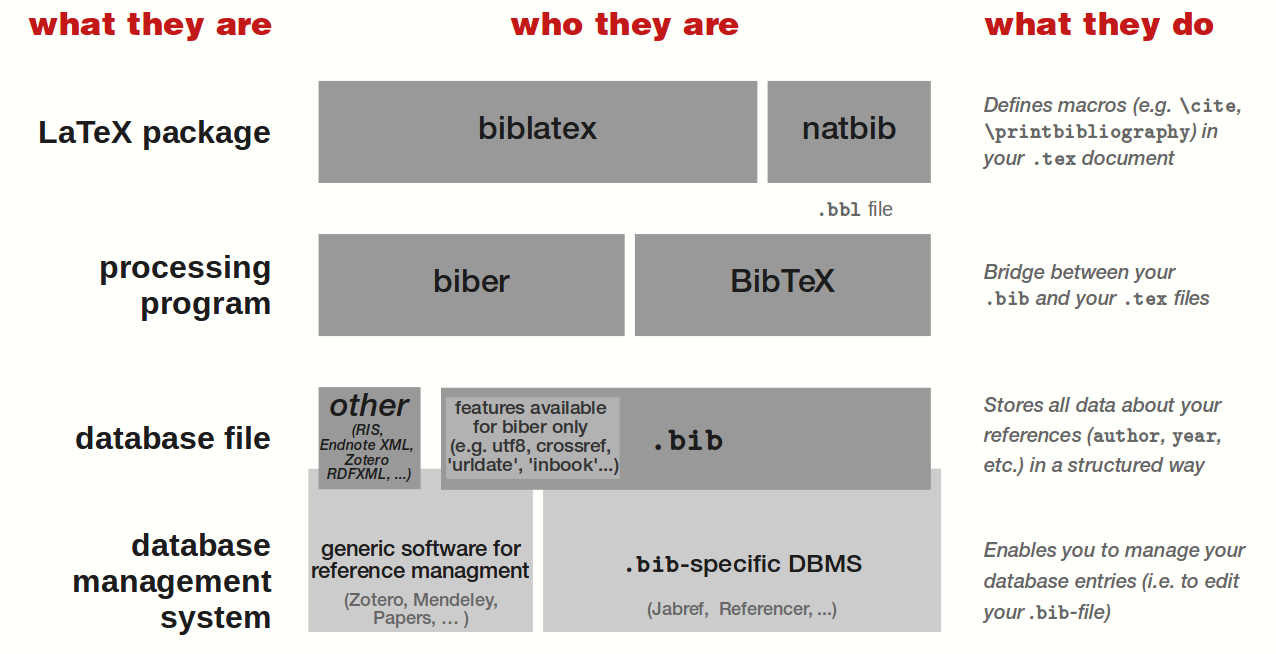
bibliographies - bibtex vs. biber and biblatex vs. natbib - TeX - LaTeX Stack Exchange
删除 bib 中未引用文献
bibexport -o clean_ref.bib main.aux
该命令将从 main.aux 中生成仅在文中引用的 bib 文件。
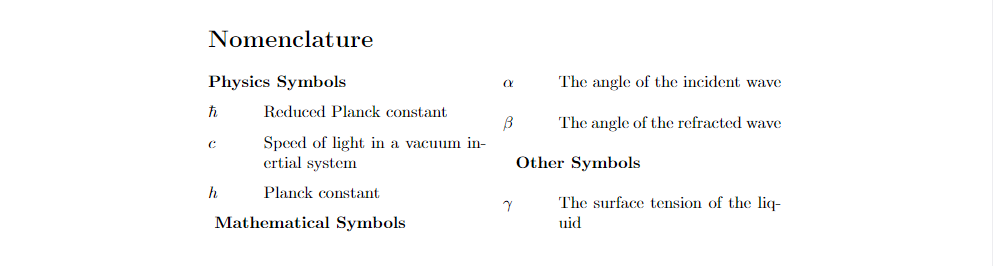
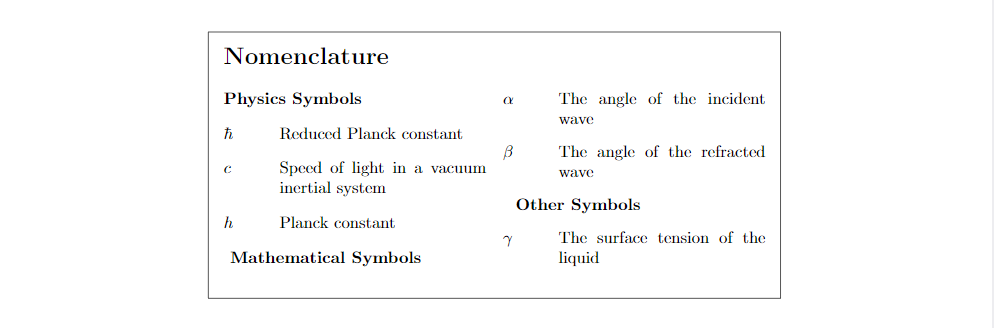
符号列表
使用 nomencl 宏包来生成和组织符号列表,通过分类和多列显示来提升可读性。
示例代码
\documentclass[a4paper]{article}
\usepackage[utf8]{inputenc}

% 导入必要的宏包
\usepackage{nomencl}  % 用于生成符号表
\makenomenclature    % 初始化符号表生成命令

\usepackage{multicol} % 允许符号表分列显示
\usepackage{framed}   % 为符号表添加边框增加美观
\usepackage{etoolbox}  % 添加 etoolbox 宏包,提供 \ifstrequal 命令

% 设置符号表的前言和后言以支持多列布局
\renewcommand*\nompreamble{\begin{multicols}{2}}
\renewcommand*\nompostamble{\end{multicols}}

% 定义如何通过组别对符号进行分类
\renewcommand\nomgroup[1]{
    \item[\bfseries
    \ifstrequal{#1}{A}{Physics Symbols}{
    \ifstrequal{#1}{B}{Mathematical Symbols}{
    \ifstrequal{#1}{C}{Other Symbols}{}}}
    ]}

% 添加符号到列表
\nomenclature[A]{$c$}{Speed of light in a vacuum inertial system}
\nomenclature[A]{$h$}{Planck constant}
\nomenclature[A]{$\hbar$}{Reduced Planck constant}
\nomenclature[B]{$\alpha$}{The angle of the incident wave}
\nomenclature[B]{$\beta$}{The angle of the refracted wave}
\nomenclature[C]{$\gamma$}{The surface tension of the liquid}

% 文档中的其他部分
\begin{document}
    % 打印符号表
    \printnomenclature
\end{document}
效果图:
说明及注意事项
\nomenclature
\nomenclature 命令添加符号条目到符号列表中,其结构如下:
\nomenclature[<prefix>]{<symbol>}{<description>}
<prefix>:可选的参数,用于对符号进行分组或排序,如[A]表示符号被分配到组A;<symbol>:符号本身,如$c$;<description>:对符号的解释或定义,即符号后的文字。
\nomgroup
\nomgroup 命令来为符号列表的不同类别(例如物理、数学、化学符号等)加上分组标题。
\renewcommand\nomgroup[1]{
  \item[\bfseries
  \ifstrequal{#1}{A}{Physics Symbols}{
  \ifstrequal{#1}{B}{Mathematical Symbols}{
  \ifstrequal{#1}{C}{Chemistry Symbols}{}}}
]}
#1:传递给nomgroup的分组标识符(即A、B、C等),由\nomenclature[<prefix>]中的<prefix>传递过来;\ifstrequal{#1}{A}{Physics Symbols}:条件判断,用于检查传递的组别标识符是否等于A。如果#1是A,则插入Physics Symbols作为该组的标题,B和C同理。\bfseries:用于将分组标题的字体加粗。
\printnomenclature
\printnomenclature
在文档中调用 \printnomenclature 来输出符号列表。
如果希望对符号列表添加边框,使用如下代码:
\begin{table*}
    \begin{framed}
    \printnomenclature
    \end{framed}
\end{table*}
编译
pdflatex <filename>.tex
makeindex <filename>.nlo -s nomencl.ist -o <filename>.nls
pdflatex <filename>.tex
页面布局
图表与正文间距过大
在图表环境 \begin 后或 \end 前,通过 \vspace{-2.0em} 手动调整。
\begin{figure}[h]
    \centering
    \includegraphics[width=0.8\textwidth]{example-image}
    \caption{示例图表}
    \label{fig:example}
    \vspace{-2.0em} % 减小图表与下方正文的间距
\end{figure}
书信
\documentclass{letter}
\signature{Your name}
\address{Street \\ City \\ Country}
\begin{document}
\begin{letter}{Company name \\ Street\\ City\\ Country}
\opening{Dear xxx:}
body content
\closing{Yours Faithfully,}
\ps{P.S. Here goes your ps.}
\encl{Enclosures.}
\end{letter}
\end{document}
论文集
- 使用
\usepackage{pdfpages}和\includepdf[page=-]{./path.file.pdf}插入外部 pdf 文件 - 使用
\includepdfset{pagecommand={\thispagestyle{fancy}}}对插入的外部 pdf 添加页码 - 使用
\includepdf[addtotoc={<pages>,<section>,<level>,<heading>,<label>},pages=-]{./path/file.pdf}记录在目录中
参考 pdfpages 手册
论文集模板
% 创建论文集
% 将 ./papers 文件夹下的PDF文件导入

\documentclass[UTF8]{ctexart}
\usepackage{pdfpages}
\usepackage[hidelinks]{hyperref}
\usepackage{fancyhdr} % 页码
\setlength{\footskip}{100pt} % 页码下移

\title{XXX 论文集}
\date{\today}

\begin{document}

\maketitle
\thispagestyle{empty}% 该页不设置页码
\newpage

\tableofcontents
\thispagestyle{empty}
\newpage

% 导入 papers 文件夹下的所有 PDF 文件

\pagenumbering{arabic}% 开始页码计数

\includepdfset{pagecommand={\thispagestyle{plain}}} % 设置页码

\section{Model predictive control}
\includepdf[
    pages=-,
    addtotoc={ 1, subsection, 1,
        A Model Predictive Control System for a Hybrid Battery-Ultracapacitor Power Source,
        mpc1
    },
    scale=0.9
]{./papers/Hredzak 等 - 2014 - A Model Predictive Control System for a Hybrid Battery-Ultracapacitor Power Source}

\includepdf[
    pages=-,
    addtotoc={ 1, subsection, 1,
        Guaranteeing a Physically Realizable Battery Dispatch Without Charge-Discharge Complementarity Constraints,
        mpc2
    },
    scale=0.9
]{./papers/Nazir和Almassalkhi - 2023 - Guaranteeing a Physically Realizable Battery Dispatch Without Charge-Discharge Complementarity Const}

\section{Others}
\includepdf[
    pages=-,
    addtotoc={1,subsection,1,
        Deep learning to estimate lithium-ion battery state of health without additional degradation experiments,
        ot1
    },
    scale=0.9
]{./papers/Lu 等 - 2023 - Deep learning to estimate lithium-ion battery state of health without additional degradation experim}

\end{document}
配置及优化
vscode 中查看正文字数
- 借助插件 LaTeX Workshop
- 在
COMMANDS栏中的Miscellaneous下,点击Count words in LaTeX project
形成 change marked 版本
- 需要
latexdiff latexdiff old.tex new.tex > changed.tex
额外:配合 git 使用
参考 CTAN: Package git-latexdiff
standalone 宏包安装
该宏包用于单独编译图片、公式等子文件,可以在子文件中使用 standalone 宏包,然后在主文件中使用 input 或 include 命令引入。
- 使用
sudo apt-get install texlive-latex-extra命令安装 - 使用
sudo apt-file search standalone.sty命令查看是否存在
编译速度优化
- 提升 I/O 效率,包括使用 Linux 而非 Windows,使用 pdf 格式图片而非 png 格式图片;
- 更为激进的可使用
draft模式;\documentclass[draft]{article}会显示图片框,但不加载图片,加快编译速度。
- 更为激进的可使用
- 使用
\include{}等划分章节,编写某章节时注释其余章节; - 使用
\special{dvipdfmx:config z 0}取消对生成的 pdf 文件的压缩。 - 使用
xelatex -interaction=nonstopmode xxx.tex忽略编译过程中的交互输入